What's Your Perspective?
A picture is worth a thousand words...

In this age of digital and social media, our students are faced with more visual information than ever before. How can we begin to teach students the power that images have to communicate, while also teaching them to question and understand that many images they see are manipulated before being published? One way that I have attempted to tackle this is to get my students to manipulate images to alter the story or message that it sends.
This particular project begins with me introducing my first graders to how a green screen and green screen technology works. I present my students with a photo of myself in front of the green screen and ask them to imagine a possible background that would give the photo more meaning. I ask things like, "What is my body doing?", "How do you think I am feeling and why?", and finally "What could the story be?" After this brief discussion I show them two possibilities that I drew, to illustrate how different backgrounds can change the story entirely even though the photo of me is the same one in both images:
I then show four more photos of myself in front of a green screen. Students are asked to choose one image of me and then use a drawing app to illustrate a background that will help the photo make more sense. Any drawing app will work as long as you can save work to the camera roll. My students chose one of the Duck Duck Moose apps: Draw and Tell, Princess Fairy Tale Maker, Superhero Comic Book Maker. Here are the four images (Note: I airdropped all four photos to all the student iPads before class so they were already in the camera roll):
Once they were done, we saved their background drawing to the camera roll and we pieced everything together using Green Screen by Do Ink. Here are a couple examples:
Creating Picture Stories
During the next two lessons, students plan their own picture stories with a partner using the same techniques and tools. I begin by showing them this chart and connecting a lot of ideas to to writing workshop.

Backgrounds:
- Just like illustrations in our books, backgrounds help us to show the setting and all the things we might see in that place.
- We can add labels, speech bubbles, or thinking bubbles to our illustrations to help convey meaning.
Characters (This is YOU!):
- Plan how you want your body to look in the photo and what feelings you are going to show on your face. It will help remind you and get you get ready for your photoshoot!
Scenes:
- Make sure that all four scenes are connected and tell a story that makes sense. For example, It wouldn't make sense if I was blowing bubbles then suddenly started eating potato chips!
I then start demonstrating how they are going use these ideas to plan their picture story using a simple storyboard. Here is one example of a plan by one of groups:
These plans also give the teachers clues on how to help students get the photo that they want for each scene. The more detailed the students can be in their plans the faster the photoshoots go!
The students already knew how to draw backgrounds and understood that they include everything, even speech bubbles, but NOT to include themselves into the drawing. We had a rotation that worked itself out between groups getting photos taken and groups drawing their backgrounds. Once everyone had all of their pieces, they could begin to put their backgrounds and photos together using the Green Screen app.
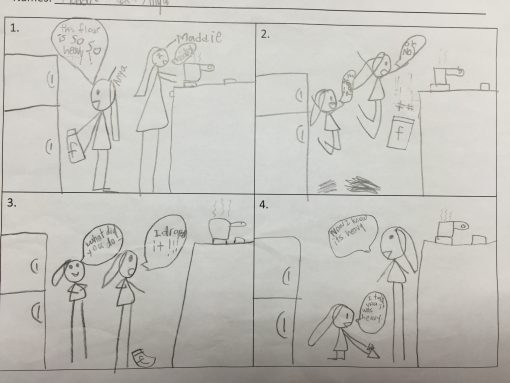
We wrapped up everything by putting the picture stories to a test! Using Shadow Puppet, we had groups insert the pages of their story in order, but then they had to swap their iPad with another group and attempt to interpret/tell the story! Did they create a detailed enough picture story that it communicated the ideas they wanted? This process was actually pretty funny, and the kids liked hearing various interpretations others had on their creations.
Version 1: Interpretation by another group
Version 2: Story told by the authors
As you can see, these two girls did a great job adding in details such as elements that would indicate they were in a kitchen (refrigerator), labelling ingredients ('f' for flour), as well as using speech bubbles to indicate further information. So, the boys who interpreted their story got a pretty close approximation! There were definitely groups that didn't do quite so well (ha!) and we all had a good laugh! But, in the process they learned how the details in our images can help communicate our ideas, or how the lack of them can confuse the audience!
Try it out...see what awesome, interesting, or crazy things your students may come up with! Enjoy!